Pages

30 May, 2022

Download multiple media files from various folders through Sitecore PowerShell

Sitecore PowerShell has a way to retrieve a media item from media library. Send-File. You pass the ID or the path of media item and file will be downloaded using Send-File command. 

PS master:\> Get-Item "master:/media library/Logo/Blog" | Send-File -Message "Blog"

In order to download all the media items from a folder, SPE has a script out of the box in the context menu. Select the folder --> Scripts --> Download. This will download all the media items, zip it and download it. Please note that the space in the file name will be replace with %20. 


We had a requirement where we need to download a list of media items from various folders. We had the list of media item path and ID in a CSV. If we loop through each ID and trigger Send-File, PowerShell should prompt a window for each file to download the file. Since we had more than 300+ items, clicking download button on each prompt is not a good solution. We used -NoDialog parameter to skip the prompt but Sitecore hangs after the first media download. As per this article, if we pass on the -NoDialog, Sitecore hangs for some reason. 

So we went through the Download script (/sitecore/system/Modules/PowerShell/Script Library/SPE/Maintenance/Media Library Maintenance/Content Editor/Context Menu/Download) which is provided out of the box. We modified to send the list of items to be downloaded via CSV. 

Our CSV had one column with ID as header. Listed all the media items IDs to be downloaded. Below script will retrieve each items based on CSV, zip it using OOTB script and download it. 


09 May, 2022

Empower Content Authors to Copy Final to Shared Layout using a button in Content Editor ribbon

Sometimes Sitecore content authors would like to merge the layout from Final to Shared Layout so that the structure of the page can be common across all the languages. In this article, we can empower the content authors to copy Final to Shared layout themselves using a click of a button in the Content Editor ribbon using Sitecore PowerShell (SPE). 


Step 1: Add Integration Point & Module

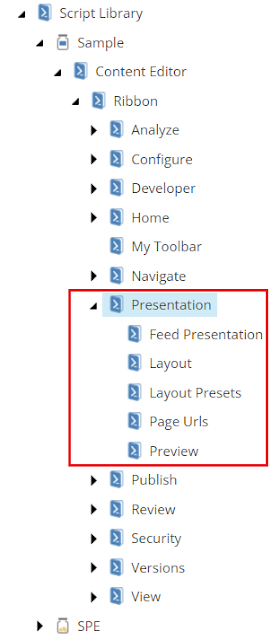
With Sitecore PowerShell (SPE), there are multiple integration points available that may be added to modules. In this case, we need to add it as a Chunk in Presentation Ribbon. 
  • Add PowerShell Script Module in Script Library folder with a name. Example: Sample


  • In the newly Sample PowerShell Script Module item, add a Integration Point Libraries. This will open a window to select the integration points. In this dialog, choose Content Editor - Ribbon. This will add the ribbons which are available in this system as Script Library


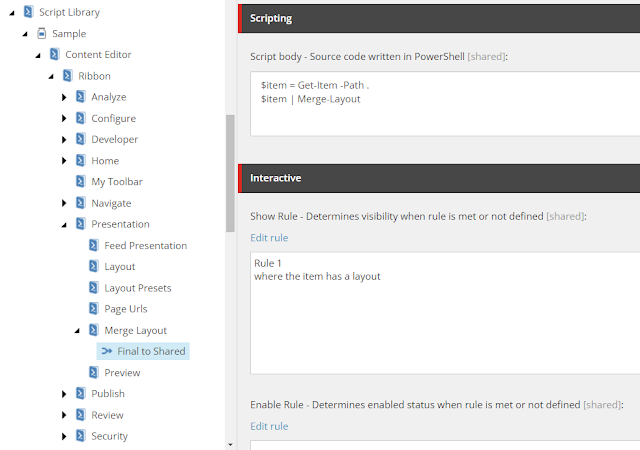
  • In the Presentation item, add a PowerShell Script Library called Merge Layout. This will be the name of the chunk in the Presentation ribbon. And then add a PowerShell script item called Final to Shared. We can set an icon in the Appearance section of this item to match with the purpose of this button. In this case, we are merging the layout so I chose Arrow merge (/~/icon/office/32x32/arrow_merge.png).


  • In the script body, we can add this simple script to get the current item and then call Merge-Layout command. The Merge-Layout command takes all the layout information stored in the FinalLayout field and merges into the SharedLayout field. The FinalLayout field is reset after the merge completes. This will be done only in the current language. In case if other languages are having final layout, additional script should be added to remove the Final Renderings field values in other languages. 


  • We can add Show Rule as "Where the item has a layout". We can also add Enable Rule to be specific to ACL of the project. For non-admins to use this button, I suggest to add whether the item is locked and locked by me. This will let the non-admins to run this script without any issues. 
  • In order to remove all the empty Ribbon libraries, go to Sample PowerShell Script Module item, right click, scripts, Purge Empty Libraries. This will remove all the empty Script Libraries. 


Step 2: Sync with Core database

Some integrations need to be synced with the Core database through the PowerShell ISE. 
  1. Open Sitecore PowerShell ISE from Launch Page. 
  2. Go to Settings Ribbon, Rebuild All button, Sync Library with Content Editor Ribbon. This will sync the newly created integration to sync with Core database. 


Since there are Show and Enable rule, if the selected item matches the rules, then button will show in the Presentation tab and we can merge the layout from Final to Shared layout by clicking the button. 


blockquote { margin: 0; } blockquote p { padding: 15px; background: #eee; border-radius: 5px; } blockquote p::before { content: '\201C'; } blockquote p::after { content: '\201D'; }