Pages

26 August, 2022

IIS 301 Redirects with Cache Control

With IIS rewrite module, we can create 301 redirects. Once the 301 redirect response is sent to the browser, client browser caches it indefinitely until browser cache is cleared or hard reload happens. This can tweaked by setting proper cache control header. 

Sometimes 301 redirects need to be changed (yes, it happens!). Even though we change it in rewrite rule in web.config, browser does not send the request to the server to know whether there is an update in the destination url. We can avoid it by setting cache-control response header. 

The problem with the IIS Rewrite Module is that once the "redirect" rule is hit, it does not process further rule. StopProcessing flag is respected only for Rewrites and not for Redirects. If it is respected, we can add outbound rules to modify the response header whenever the response status code is 301. 

A probable solution is to create an intermediate page "redirect.aspx". This page will redirect the request to target URL with proper cache control. Please make sure that instead of Action type as Redirect, we need to change it to Rewrite in IIS Rewrite rule. 


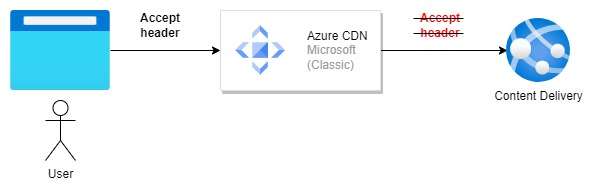
In the aspx page, we can set cache control so that the 301 redirects can be cached in proxy (CDN) for a specific days or hours. In the IIS rewrite rule, we need to change from Redirect to Rewrite. 

Below aspx page will not allow any layer to cache the 301 redirects. Please note that this may increase the traffic to our web server since all the 301 redirects will hit the web server to get the target URL all the time. It is important to set the proper cache control to avoid heavy load on the web server. Based on current infrastructure, we can set cache control header to cache it in CDN or the web server itself.


24 August, 2022

Docker - Increase web.config size

Since we have many IIS rewrites, the web.config file size has exceeded the default 250 KB. We moved all the redirects to separate rewriteMaps configuration but the overall web.config file size has been more than 2.5 MB. In order for the application to work, we went ahead and set the registry changes in Docker images. 

While building the Sitecore CM image, we added few lines in Dockerfile to set the max size. Below lines will increase the web.config max size to 10 MB.

SHELL ["powershell", "-Command", "$ErrorActionPreference = 'Stop'; $ProgressPreference = 'SilentlyContinue';"]

# Set the web.config size to 10MB to support rewriteconfig
RUN New-Item -Path 'HKLM:\SOFTWARE\Wow6432Node\Microsoft\InetStp\Configuration'
RUN New-Item -Path 'HKLM:\SOFTWARE\Microsoft\InetStp\Configuration'
RUN Reg Add HKEY_LOCAL_MACHINE\SOFTWARE\Wow6432Node\Microsoft\InetStp\Configuration /v MaxWebConfigFileSizeInKB /t REG_DWORD /d 10240
RUN Reg Add HKEY_LOCAL_MACHINE\SOFTWARE\Microsoft\InetStp\Configuration /v MaxWebConfigFileSizeInKB /t REG_DWORD /d 10240

Update: Dec 2022:

It is recommended to convert multiple RUN statements to multiline. 

Example: 

RUN {cmd1}  \
  && {cmd2} \
  && {cmd3} \


Docker - Install IIS Rewrite Module

Recently I wanted to test the IIS redirects in the local Sitecore Docker environment. In order to install IIS rewrite module, we can add few lines in CM Dockerfile. Please note that we need to rebuild the CM image. 

  • First, we need to get the MSI file for Microsoft IIS Rewrite site. You can get it from here
  • Then add the above lines to CM Dockerfile which will download the MSI file and install it silently. 
SHELL ["powershell", "-Command", "$ErrorActionPreference = 'Stop'; $ProgressPreference = 'SilentlyContinue';"]

# Install IIS Rewrite Module
WORKDIR /install
ADD https://download.microsoft.com/download/1/2/8/128E2E22-C1B9-44A4-BE2A-5859ED1D4592/rewrite_amd64_en-US.msi rewrite_amd64_en-US.msi
RUN Write-Host 'Installing URL Rewrite' ; Start-Process msiexec.exe -ArgumentList '/i', 'rewrite_amd64_en-US.msi', '/quiet', '/norestart' -NoNewWindow -Wait;

21 August, 2022

Sitecore - Dianoga with Azure CDN (Microsoft) Classic - Limitation and Solution

Dianoga is an automatic image optimizer for the Sitecore media library. This optimizer can optimize the images and cache in Sitecore Media Cache (MediaCacheAsync) or optimize the image on the fly and return the optimized image (GetMediaStreamSync). Most of the Sitecore prod environments are enabled by CDN and the second option will fit in this scenario. If CDN is not used, then Sitecore Media Cache (MediaCacheAsync) is the right choice. 

Update - 12/16/2022: Dianoga module (6.1.0) has been updated (https://github.com/kamsar/Dianoga/pull/119) to support custom header as described in the below article. 

Next-gen formats:

Next-gen images use formats with superior compression and quality characteristics compared to their GIF, JPEG, and PNG ancestors. These image formats support advanced features designed to take up less data while maintaining a high quality level, making them perfect for web use. (reference article)

An image format for the Web 

WebP is a modern image format that provides superior lossless and lossy compression for images on the web. Using WebP, webmasters and web developers can create smaller, richer images that make the web faster. (reference article)

Image Optimization in an environment with Azure CDN (MS):

In order to enable the next-gen formats and let CDN cache the optimized images for subsequent requests, we need to enable a configuration in Dianoga - Dianoga.NextGenFormats.CDN.config

  • When the first media request is being made, browser will send the accepted MIME types in ACCEPT header. (The Accept header lists the MIME types of media resources that the agent is willing to process. This is a comma-separated list of MIME types, each combined with a quality factor, a parameter that indicates the relative degree of preference between the different MIME types.)

  • Dianoga uses this header value and if the browser accepts the next-gen formats, then it will process it in WebP or other formats and return the optimized images. This will be cached in CDN and it will be served for other users if another request is made. 

  • If we are using Azure CDN Classic (Microsoft), then the accept header is NOT passed to the origin server. This is a limitation in Azure CDN side. In case if you are using Azure Premium Verizon CDN, then this header will be passed to origin server and Dianoga will be able to process it without any problems. 

    https://docs.microsoft.com/en-us/answers/questions/594279/azure-cdn-does-not-forward-accept-header-to-origin.html

    As of now, there is no news on whether this header will be accepted by Azure CDN. 

Possible solutions:
  1. Upgrade to Azure Premium Verizon CDN:

    We can setup Azure Premium Verizon CDN. Accept header is passed to Origin server and Dianoga will be able to optimize the image in webP format. Moreover the CDN admin portal can handle various complex caching scenarios. Customization can be applied using headers and other parameters. 

    Cost: It is costly compared to Azure CDN Classic. 2x to 3x costlier. 

  2. Pass the accept header value in a different header using Rule Engine:

    With the basic rule engine in Azure CDN, we can read the accept header sent from the browser and pass it in a different header to origin server. In the origin server, we can then read the custom header and then optimize the images. There is no need of additional cost to setup Premium Verizon CDN here. 

    Rule engine for WebP:


  • In this rule, accept header is checked whether it contains "webp" and then "image/webp" is added to a custom header named "CustomAccept". In order to execute this rule only for media files, request path rule has been added to ~/jssmedia (jss site) and ~/media requests. 

  • In Dianoga, we can check for this custom header and if the next gen format mime type is accepted by the browser using CustomAccept header, we can run the optimizer and send the optimized images. 

Some clients do no approve for Premium Verizon CDN due to cost or other factors. Tweaking the header value and pass it in a different header may be helpful. 


17 August, 2022

Enable Sitecore Content Authors to move bulk items in Content and Media Library - PowerShell

Before Sitecore PowerShell, I created a Sitecore Marketplace (retired) module - SmartTools CopyMove (https://github.com/nehemiahj/SmartTools.CopyMove) which enabled content authors to copy parent item without sub items to a new folder and move/copy child items without the parent item. 

With Sitecore PowerShell in place, many of these module can be easily implemented. Thanks to Adam Najmanowicz and Michael West and the many contributors. 

This script will enable the content authors to take care of moving a bunch of items from one or multiple folders to a destination folder. When this script is executed, Content author will be provided with a dialog to choose the items and the destination folder and on click of the move button, items will be moved. 


In order for content author to start the process, we can add a content editor button in Home ribbon and Operations chunk. In the PowerShell system modules folder, PowerShell Script Library can be created with the move script. Here we can add the rules to determine whether this button is available for all the content authors or only to the users belong to a Role. 

Content Editor --> Ribbon --> Home tab --> Operations chunk --> Bulk Move button

../Modules/PowerShell/Script Library/SPE/Scripts/Content Editor/Ribbon/Home/Operations/Bulk Move.


When content author click the button, there will be an option to select Content and Media library items and a field for selecting the destination folder. 
  • You can move either Content or Media item at a time.
  • If the Items to move contains a parent of the Destination folder, then there will be an error. (You cannot move a parent item to a child item)
  • Content can be moved to another content folder.
  • Media item can be moved to another media library folder or media item.
  • If there is a selection of both content and media item, there will be error to let user to select correct items.
  • If the items to be moved are not selected or destination folder is not selected, there will be a validation error.
  • Destination folder can be either content or media folder. 
  • Limitation: Destination Folder is not restricted to only Content and Media folder at this time. Entire tree will be available. If the content author chooses other than content and media folder, there will be a validation error. 
>>> Planning to enhance this in a couple of months


blockquote { margin: 0; } blockquote p { padding: 15px; background: #eee; border-radius: 5px; } blockquote p::before { content: '\201C'; } blockquote p::after { content: '\201D'; }