In order to transform links in HTML to friendly URLs, you can make use renderField pipeline or Sitecore LinkManager ExpandDynamicLinks() method.
There are cases where you would need to expand the HTML with friendly URLs as part of the Sitecore PowerShell report. In this article, you can see some examples on how this can be done using PowerShell and also, this can be used as a reference to run other pipelines in Sitecore PowerShell.
Option 1: Using Pipeline
Option 2: Using LinkManager
Option 3: Custom Method
In case if you have any custom logic, you can add it as a method and call it via PowerShell.
The purpose of Scheduled Publish Module is to give the content editor the option to delay the publishing of an item for a future point in time. Thus, a page or a feature that should go live at a specific time can be created and populated in Sitecore and previewed long before it goes live without the risk of an accidental publish before the specific time. Moreover, there is no need for a content-editor to go to Sitecore and manually publish something at an inconvenient hour, e.g. a New Year’s announcement. Scheduled Publish intends to give the content-editor all features of a normal publish with the addition of automation, timing and notifications.
Updated to Sitecore 10.2
This module was built by Hedgehog few years ago and it was not updated to Sitecore 10. I forked it and updated to work with Sitecore 10.2. As part of this task,
TDS project has been removed and converted to Sitecore Content Serialization with version 5.1.x.
Updated the .NET version, referenced latest Sitecore nuget packages and fixed build issues.
Updated the documentation from an old source to GitHub readme file.
Created a Sitecore Package for installing it without the source.
Lately, I was exploring options to create a Docker asset image for this module. Robbert Hock has created an excellent Docker asset image creator script which can intake the Sitecore package and convert it into an asset image. When you run the script, you may face this issue "The SQL provider cannot run with dacpac option because of a missing dependency". You can follow the below steps to fix it. Otherwise, it was super easy to create the image using this script.
To fix the dacpac missing dependency issue:
Install the following applications by downloading it from here.
Microsoft SQL Server 2012 Data-Tier Application Framework
This article is about finding and deleting xDB contact outliers automatically using Analytics Database Manager and PowerShell. Everyone talks about Sitecore SmartHub nowadays but huge number of clients are still with Sitecore XP and may face issues with xConnect performance.
Let's talk about xDB contacts and Interactions.
xDB Contacts
A contact represents an individual who interacts with or may potentially interact with your organization. Contacts are represented by the Sitecore.XConnect.Contact class, and are uniquely identified by ID (of type Guid) within the xDB. ref
Interactions
An interaction describes any point at which a contact interfaces with a brand, either online or offline. Examples of interactions include:
Purchasing a something from a physical store
Using an app
Browsing a website
A phone conversation
Xdb Contact Outliers
Outliers - contacts with abnormal number of interactions.
Error
2022-05-27 05:05:30.910 -07:00 [Error] ["XdbContextLoggingPlugin"] XdbContext Batch Execution Exception
Sitecore.Xdb.Collection.Failures.DataProviderException: Execution Timeout Expired.
The timeout period elapsed prior to completion of the operation or the server is not responding. --->
System.Data.SqlClient.SqlException: Execution Timeout Expired.
The timeout period elapsed prior to completion of the operation or the server is not responding. --->
System.ComponentModel.Win32Exception: The wait operation timed out
If you have used Sitecore xConnect, you might have faced above error sometimes. Kelly Rusk has an excellent post on how excessive interactions can be prevented.
As per Sitecore support, contacts with >1000 interactions can be considered 'excessive'. so with this large number of interactions I suspect it was causing the SQL performance issues.
There is a module called Sitecore Analytics Database Manager (ADM) which allows performing various operations with collection database:
Removing contact and interactions data.
Viewing database statistics.
Rebuild calculated facets.
As per the documentation, the current version of ADM has the following functionalities:
Remove all data for contacts that do not have interactions after the specified date or for date range.
Remove only interactions after the specified date or for date range. Rebuild of all calculated facets is triggered automatically for all contacts when the process finishes. Contacts are not removed in this case.
Rebuild the selected calculated facets.
Remove all data for a specific contact defined by the contact id or source and identifier.
Check if the contact with specific id or source and identifier exists.
Retrieve the xDB statistics.
Retrieve xDB Index statistics.
Find outliers in the database.
Once we install the ADM module, there is a set of APIs available to automate the xDB maintenance. We can use a PowerShell script to call this API and schedule the deletion of xDB contact Outliers.
Authentication:
In order for calling any API, we need to authenticate the request. To get the access token, we can enable non-interactive client login. We can refer this article to enable it in Identity server. Once enabled, we will get Client_ID and Client_Secret. With that, we can call login API to get the Access Token.
Generate Latest xDB Outliers List
Using this API, xDB outliers list can be generated. It is a task and with this API, you can let ADM start this process.
This process may take minutes to hours based on the size of the xDB. It is better to start this task and we can get the status of the task using another API. Before we run the 3 step, we can execute the below API to get the status and if it is completed, we can start the next step.
Delete the Outliers
In this step, there is an API to get the Outliers. Once we get the Outliers, we can call another API to delete the contact with the Outliers contact IDs. Deletion is also a task so once we execute the delete request, we need to check if the task is completed using the 3rd API which will give the status of the deletion request. Once it is completed, we can repeat the whole process.
Get the Outliers:
Delete the Contact by IDs
Check if the Deletion request is completed
Repeat this step till we clear the contacts with abnormal number of interactions. This process can give us an overview on how we can find the Outliers using ADM and then delete it.
With IIS rewrite module, we can create 301 redirects. Once the 301 redirect response is sent to the browser, client browser caches it indefinitely until browser cache is cleared or hard reload happens. This can tweaked by setting proper cache control header.
Sometimes 301 redirects need to be changed (yes, it happens!). Even though we change it in rewrite rule in web.config, browser does not send the request to the server to know whether there is an update in the destination url. We can avoid it by setting cache-control response header.
The problem with the IIS Rewrite Module is that once the "redirect" rule is hit, it does not process further rule. StopProcessing flag is respected only for Rewrites and not for Redirects. If it is respected, we can add outbound rules to modify the response header whenever the response status code is 301.
A probable solution is to create an intermediate page "redirect.aspx". This page will redirect the request to target URL with proper cache control. Please make sure that instead of Action type as Redirect, we need to change it to Rewrite in IIS Rewrite rule.
In the aspx page, we can set cache control so that the 301 redirects can be cached in proxy (CDN) for a specific days or hours. In the IIS rewrite rule, we need to change from Redirect to Rewrite.
Below aspx page will not allow any layer to cache the 301 redirects. Please note that this may increase the traffic to our web server since all the 301 redirects will hit the web server to get the target URL all the time. It is important to set the proper cache control to avoid heavy load on the web server. Based on current infrastructure, we can set cache control header to cache it in CDN or the web server itself.
Since we have many IIS rewrites, the web.config file size has exceeded the default 250 KB. We moved all the redirects to separate rewriteMaps configuration but the overall web.config file size has been more than 2.5 MB. In order for the application to work, we went ahead and set the registry changes in Docker images.
While building the Sitecore CM image, we added few lines in Dockerfile to set the max size. Below lines will increase the web.config max size to 10 MB.
SHELL ["powershell", "-Command", "$ErrorActionPreference = 'Stop'; $ProgressPreference = 'SilentlyContinue';"]

# Set the web.config size to 10MB to support rewriteconfig
RUN New-Item -Path 'HKLM:\SOFTWARE\Wow6432Node\Microsoft\InetStp\Configuration'
RUN New-Item -Path 'HKLM:\SOFTWARE\Microsoft\InetStp\Configuration'
RUN Reg Add HKEY_LOCAL_MACHINE\SOFTWARE\Wow6432Node\Microsoft\InetStp\Configuration /v MaxWebConfigFileSizeInKB /t REG_DWORD /d 10240
RUN Reg Add HKEY_LOCAL_MACHINE\SOFTWARE\Microsoft\InetStp\Configuration /v MaxWebConfigFileSizeInKB /t REG_DWORD /d 10240
Update: Dec 2022:
It is recommended to convert multiple RUN statements to multiline.
Recently I wanted to test the IIS redirects in the local Sitecore Docker environment. In order to install IIS rewrite module, we can add few lines in CM Dockerfile. Please note that we need to rebuild the CM image.
First, we need to get the MSI file for Microsoft IIS Rewrite site. You can get it from here.
Then add the above lines to CM Dockerfile which will download the MSI file and install it silently.
Dianoga is an automatic image optimizer for the Sitecore media library. This optimizer can optimize the images and cache in Sitecore Media Cache (MediaCacheAsync) or optimize the image on the fly and return the optimized image (GetMediaStreamSync). Most of the Sitecore prod environments are enabled by CDN and the second option will fit in this scenario. If CDN is not used, then Sitecore Media Cache (MediaCacheAsync) is the right choice.
Next-gen images use formats with superior compression and quality characteristics compared to their GIF, JPEG, and PNG ancestors. These image formats support advanced features designed to take up less data while maintaining a high quality level, making them perfect for web use. (reference article)
An image format for the Web
WebP is a modern image format that provides superior lossless and lossy compression for images on the web. Using WebP, webmasters and web developers can create smaller, richer images that make the web faster. (reference article)
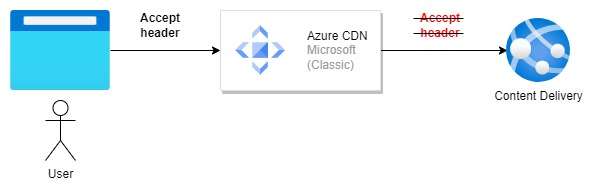
Image Optimization in an environment with Azure CDN (MS):
In order to enable the next-gen formats and let CDN cache the optimized images for subsequent requests, we need to enable a configuration in Dianoga - Dianoga.NextGenFormats.CDN.config.
When the first media request is being made, browser will send the accepted MIME types in ACCEPT header. (The Accept header lists the MIME types of media resources that the agent is willing to process. This is a comma-separated list of MIME types, each combined with a quality factor, a parameter that indicates the relative degree of preference between the different MIME types.)
Dianoga uses this header value and if the browser accepts the next-gen formats, then it will process it in WebP or other formats and return the optimized images. This will be cached in CDN and it will be served for other users if another request is made.
If we are using Azure CDN Classic (Microsoft), then the accept header is NOT passed to the origin server. This is a limitation in Azure CDN side. In case if you are using Azure Premium Verizon CDN, then this header will be passed to origin server and Dianoga will be able to process it without any problems.
As of now, there is no news on whether this header will be accepted by Azure CDN.
Possible solutions:
Upgrade to Azure Premium Verizon CDN:
We can setup Azure Premium Verizon CDN. Accept header is passed to Origin server and Dianoga will be able to optimize the image in webP format. Moreover the CDN admin portal can handle various complex caching scenarios. Customization can be applied using headers and other parameters.
Cost: It is costly compared to Azure CDN Classic. 2x to 3x costlier.
Pass the accept header value in a different header using Rule Engine:
With the basic rule engine in Azure CDN, we can read the accept header sent from the browser and pass it in a different header to origin server. In the origin server, we can then read the custom header and then optimize the images. There is no need of additional cost to setup Premium Verizon CDN here.
Rule engine for WebP:
In this rule, accept header is checked whether it contains "webp" and then "image/webp" is added to a custom header named "CustomAccept". In order to execute this rule only for media files, request path rule has been added to ~/jssmedia (jss site) and ~/media requests.
In Dianoga, we can check for this custom header and if the next gen format mime type is accepted by the browser using CustomAccept header, we can run the optimizer and send the optimized images.
Some clients do no approve for Premium Verizon CDN due to cost or other factors. Tweaking the header value and pass it in a different header may be helpful.
Before Sitecore PowerShell, I created a Sitecore Marketplace (retired) module - SmartTools CopyMove (https://github.com/nehemiahj/SmartTools.CopyMove) which enabled content authors to copy parent item without sub items to a new folder and move/copy child items without the parent item.
With Sitecore PowerShell in place, many of these module can be easily implemented. Thanks to Adam Najmanowicz and Michael West and the many contributors.
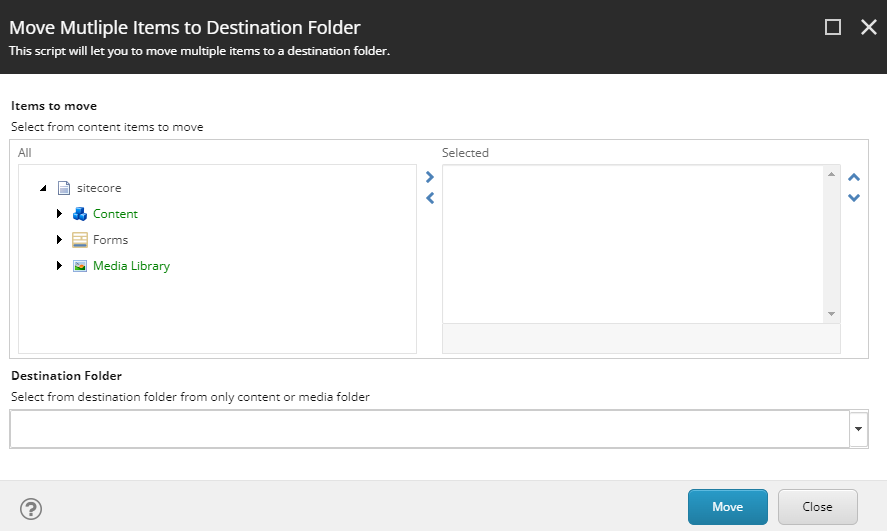
This script will enable the content authors to take care of moving a bunch of items from one or multiple folders to a destination folder. When this script is executed, Content author will be provided with a dialog to choose the items and the destination folder and on click of the move button, items will be moved.
In order for content author to start the process, we can add a content editor button in Home ribbon and Operations chunk. In the PowerShell system modules folder, PowerShell Script Library can be created with the move script. Here we can add the rules to determine whether this button is available for all the content authors or only to the users belong to a Role.
When content author click the button, there will be an option to select Content and Media library items and a field for selecting the destination folder.
You can move either Content or Media item at a time.
If the Items to move contains a parent of the Destination folder, then there will be an error. (You cannot move a parent item to a child item)
Content can be moved to another content folder.
Media item can be moved to another media library folder or media item.
If there is a selection of both content and media item, there will be error to let user to select correct items.
If the items to be moved are not selected or destination folder is not selected, there will be a validation error.
Destination folder can be either content or media folder.
Limitation: Destination Folder is not restricted to only Content and Media folder at this time. Entire tree will be available. If the content author chooses other than content and media folder, there will be a validation error.
>>> Planning to enhance this in a couple of months
In Sitecore XP, to cancel or pick a winner (variation) in A/B test, a content test owner who created the test or an administrator can do it. In case if there is an another non-admin content author (who is not the content test owner) who wants to pick a winner, content author should be part of a Sitecore role - sitecore\Analytics Advanced Testing.
In our project, we had a project specific Sitecore role called sitecore\Base Content Editor role. Then based on content author location, we have created Site specific roles (example: Site Role 1) inheriting the Base Content Editor.
Base Content Editor role has content authoring specific Sitecore roles and also sitecore\Analytics Advanced Testing. Content authors are added to Site Roles. A content author user (User 1) created an A/B tested and started it. It ran for few weeks and another content author user (User 2) with the same access tried to pick a winner based on the test results but the button was greyed out.
Observations:
If we add Analytics Advanced Testing role to the second content author user directly and not as an inherited role, then pick a winner button was enabled and user was able to click the button.
It seems that hasRole processor in <canCancelTest> pipeline is checking only the top level role of the user and not the inherited roles. Ideally Sitecore should be checking the top level user roles and also the inherited roles. Sitecore Support has added this to their tracker (Reference number: 542108) and they will change the behavior of the hasRole processor.
If we add the custom Site Roles to the <canCancelTest> pipeline -> HasRole processor, the second content author was able to click the pick a winner button.
You can choose the option 2 if we have any site specific roles so that the second content authors can cancel or pick a winner of a test created by content author one.
Recently developers are facing issues when installing Sitecore CLI. Or it may install version 5.0.16 which is not released officially.
PS C:\Project\Working\cli1> dotnet tool install --add-source=https://sitecore.myget.org/F/sc-packages/api/v3/index.json sitecore.cli
You can invoke the tool from this directory using the following commands: 'dotnet tool run sitecore' or 'dotnet sitecore'.
Tool 'sitecore.cli' (version '5.0.16') was successfully installed. Entry is added to the manifest file C:\Project\Working\cli1\.config\dotnet-tools.json.
error NU1202: Package sitecore.cli 5.0.16 is not compatible with netcoreapp3.1 (.NETCoreApp,Version=v3.1) / any. Package sitecore.cli 5.0.16 supports: net6.0 (.NETCoreApp,Version=v6.0) / any
The tool package could not be restored.
Tool 'sitecore.cli' failed to install. This failure may have been caused by:

* You are attempting to install a preview release and did not use the --version option to specify the version.
* A package by this name was found, but it was not a .NET Core tool.
* The required NuGet feed cannot be accessed, perhaps because of an Internet connection problem.
* You mistyped the name of the tool.

For more reasons, including package naming enforcement, visit https://aka.ms/failure-installing-tool
Sitecore Official release version for Sitecore CLI as of July 7th 2022 is 4.2.1. Unofficially Sitecore published Sitecore CLI 5.0 as they are testing the new features.
Anyone who installs Sitecore CLI without a specific version will get v5.0. Add version parameter to install the specific version to avoid this issue.
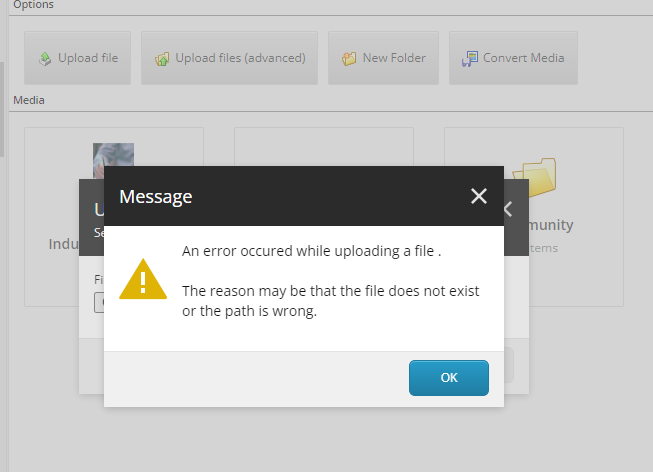
In Sitecore Media Library, multiple items with same name is denied by default. This is configured by the setting AllowDuplicateItemNamesOnSameLevel. Default it is set to false to restrict the duplication.
If a content author uploads a media item in a folder which has an item with same name, then Upload File dialog will throw an error. "An error occured while uploading a file. The reason may be that the file does not exist or the path is wrong.". This is not a meaningful error to the content authors.
1984 14:44:04 ERROR Could not save posted file: Related Items.png
Exception: Sitecore.Exceptions.DuplicateItemNameException
Message: The item name "Related Items" is already defined on this level.
Source: Sitecore.Kernel
   at Sitecore.Data.Items.ItemUtil.AssertDuplicateItemName(Item destinationItem, Item sourceItem, String name)
   at Sitecore.Data.Items.ItemUtil.AssertItemName(Item destinationItem, Item sourceItem, String name)
   at Sitecore.Data.Items.Item.Add(String name, TemplateID templateID)
   at Sitecore.Resources.Media.MediaCreator.CreateItem(String itemPath, String filePath, MediaCreatorOptions options)
   at Sitecore.Resources.Media.MediaCreator.AttachStreamToMediaItem(Stream stream, String itemPath, String fileName, MediaCreatorOptions options)
   at Sitecore.Resources.Media.MediaCreator.CreateFromStream(Stream stream, String filePath, MediaCreatorOptions options)
   at Sitecore.Resources.Media.MediaUploader.UploadToDatabase(List`1 list)
   at Sitecore.Resources.Media.MediaUploader.Upload()
   at Sitecore.Pipelines.Upload.Save.Process(UploadArgs args)
In order to provide content author with meaningful error message, you can overwrite the Upload Media dialog and render a meaning error message. sitecore.shell.Applications.Media.UploadMedia.UploadMediaPage2 Dialog has to be modified. Sample code is placed in this repo.
Back to blogging after a month of learning and completing certifications. June has been a month of Certifications in Sitecore community. :)
Containers for Sitecore development has reduced the onboarding time for new team members and it is easy to bring up and bring down a Sitecore environment without impacting much on the hosting environment.
When Docker Desktop works, everything is fine. When it does not, sometimes we have to spend hours to find the root cause especially in an office laptops where company policies are applied. That's been the case after Docker Desktop 4.7+ onwards.
ERROR: for cortexprocessingworker Container "22039ee585b5" is unhealthy.
ERROR: for xdbautomationworker Container "22039ee585b5" is unhealthy.
ERROR: for xdbsearchworker Container "22039ee585b5" is unhealthy.
ERROR: Encountered errors while bringing up the project.
Recently encountered this issue with Docker Desktop 4.9.1. There are multiple ways mentioned in the below links.
We (SitecoreWarriors) had a chance to participate in Sitecore Hackathon 2022 and we peeked into how the Sitecore's official plugins are created and how a new plugin can be created using Extensibility package provided by Sitecore. In this article, I wanted to explain few steps to create a new plugin, package it and publish it to nuget.org or any other private package manager.
Create Plugin Project - .NET Core Class Library
Create Management Service - .NET Framework 4.8 Class Library
Package and Publish Plugin
Create Plugin Project
In order to create a plugin, we need to create a .NET Core Class Library.
Enables us to use SitecoreApiClient which helps to send and receive response from Sitecore through management service.
Helps to generate the API request along with access token and send it to Sitecore.
Not sure why but Sitecore may move this piece out of Serialization Client package and create it as a standalone package to avoid this dependency.
Next step is to implement ISitecoreCliExtension interface which will let us to register Commands. As part of this sample application, we are trying to create a Job plugin which can retrieve the jobs list from Sitecore.
Then we can create new SubCommand class inheriting SubcommandBase from Sitecore.Devex.Client.Cli.Extensibility package. This will let us to override the handle method to implement the logic to call Sitecore API for this SubCommand.
In the SubCommand implementation, use SitecoreApiClient and trigger the request to Sitecore Management API.
Create Management Service
Sitecore Management Service gets the request from CLI and execute the request in Sitecore Context.
Authentication token obtained from CLI login is sent as part of the Bearer token.
Depending upon the solution, the dependencies changes. In this case, we needed Sitecore.Kernel, Sitecore.DependencyInjection package.
Management services uses GraphQL. Queries and Mutations.
Queries are the GraphQL equivalent to GET calls in REST. mutations represent the state-changing methods in REST (like DELETE, PUT, PATCH, etc).
In this example, we are just getting Jobs list. So we can go with query. Implement Sitecore.Services.GraphQL.Schemas.SchemaProviderBase from Sitecore.Services.GraphQL and override CreateRootQueries which in turn returns the data to be returned to CLI. Logic is get the jobs list from JobManager and return the results.
Build the class library along with configuration and package it as Sitecore Package to be installed via Installation Wizard.
In this article, I will explain how we can package it using NuGet Package Explorer.
We need to prepare the package content. Package should have the plugin library (.dll). Please note that DLL name and the plugin name should match otherwise we may get errors. Refer this article for more details - Sitecore CLI Extension Development - Possible errors and solution.
Once the NuGet Package Explorer is downloaded and opened, choose Create a new package.
Go to Edit menu and click Edit Metadata.
Add the plugin name in the ID field
Create a new folder called plugin
Add plugin class library and few other assemblies like Sitecore.DevEx.Serialization.Client and Microsoft.Extensions.Http to the plugin folder.
Go to nuget.org, create a new account, login to the account, click on your username and go to API keys.
Create a new API key. Provide a key name and click create. Copy the generated key and save it securely.
Go back to the NuGet package explorer, go to File and click Publish. Enter the copied API key in the Publish Key or PAT field and then click publish. It should be published immediately and it may take 10 minutes for the package to be available in the nuget.org search results.
How to install the plugin and use it
Install the management service package created in the second step in Sitecore CM using installation wizard.
Once the package is available in nuget.org search results, you can login to CLI using dotnet sitecore login.
Install the plugin using dotnet sitecore plugin add -n SitecorePlugin.Custom and plugin will be installed in your workstation.
Sitecore PowerShell has a way to retrieve a media item from media library. Send-File. You pass the ID or the path of media item and file will be downloaded using Send-File command.
In order to download all the media items from a folder, SPE has a script out of the box in the context menu. Select the folder --> Scripts --> Download. This will download all the media items, zip it and download it. Please note that the space in the file name will be replace with %20.
We had a requirement where we need to download a list of media items from various folders. We had the list of media item path and ID in a CSV. If we loop through each ID and trigger Send-File, PowerShell should prompt a window for each file to download the file. Since we had more than 300+ items, clicking download button on each prompt is not a good solution. We used -NoDialog parameter to skip the prompt but Sitecore hangs after the first media download. As per this article, if we pass on the -NoDialog, Sitecore hangs for some reason.
So we went through the Download script (/sitecore/system/Modules/PowerShell/Script Library/SPE/Maintenance/Media Library Maintenance/Content Editor/Context Menu/Download) which is provided out of the box. We modified to send the list of items to be downloaded via CSV.
Our CSV had one column with ID as header. Listed all the media items IDs to be downloaded. Below script will retrieve each items based on CSV, zip it using OOTB script and download it.
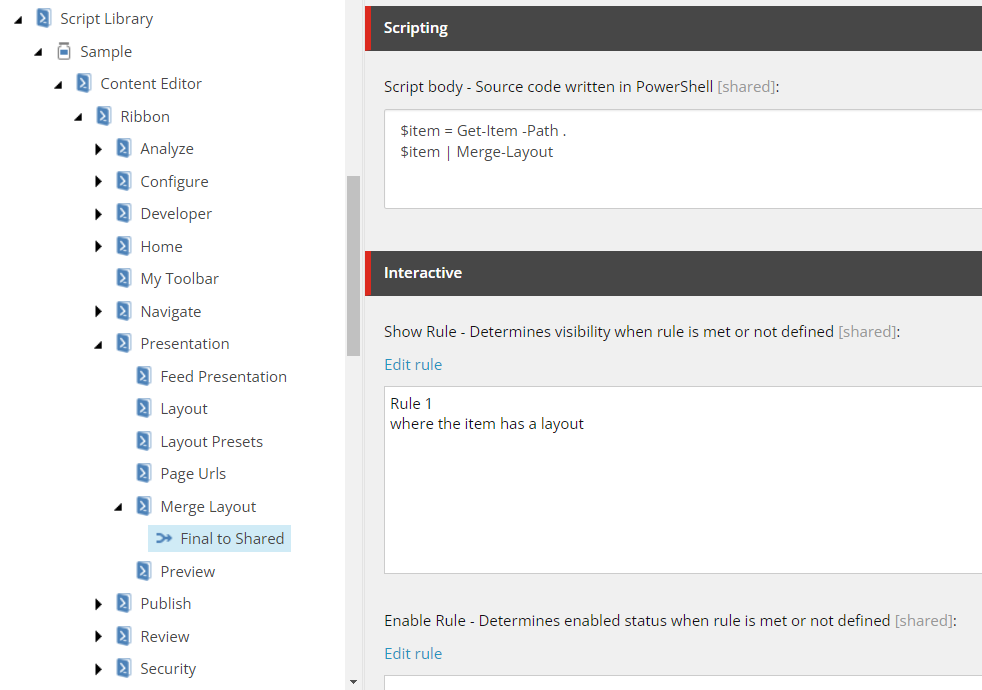
Sometimes Sitecore content authors would like to merge the layout from Final to Shared Layout so that the structure of the page can be common across all the languages. In this article, we can empower the content authors to copy Final to Shared layout themselves using a click of a button in the Content Editor ribbon using Sitecore PowerShell (SPE).
Step 1: Add Integration Point & Module
With Sitecore PowerShell (SPE), there are multiple integration points available that may be added to modules. In this case, we need to add it as a Chunk in Presentation Ribbon.
Add PowerShell Script Module in Script Library folder with a name. Example: Sample
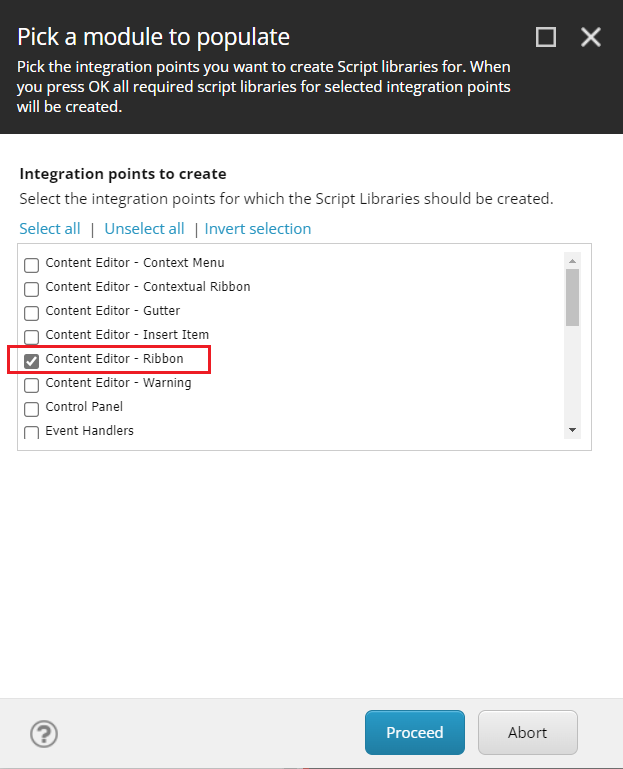
In the newly Sample PowerShell Script Module item, add a Integration Point Libraries. This will open a window to select the integration points. In this dialog, choose Content Editor - Ribbon. This will add the ribbons which are available in this system as Script Library.
In the Presentation item, add a PowerShell Script Library called Merge Layout. This will be the name of the chunk in the Presentation ribbon. And then add a PowerShell script item called Final to Shared. We can set an icon in the Appearance section of this item to match with the purpose of this button. In this case, we are merging the layout so I chose Arrow merge (/~/icon/office/32x32/arrow_merge.png).
In the script body, we can add this simple script to get the current item and then call Merge-Layout command. The Merge-Layout command takes all the layout information stored in the FinalLayout field and merges into the SharedLayout field. The FinalLayout field is reset after the merge completes. This will be done only in the current language. In case if other languages are having final layout, additional script should be added to remove the Final Renderings field values in other languages.
We can add Show Rule as "Where the item has a layout". We can also add Enable Rule to be specific to ACL of the project. For non-admins to use this button, I suggest to add whether the item is locked and locked by me. This will let the non-admins to run this script without any issues.
In order to remove all the empty Ribbon libraries, go to Sample PowerShell Script Module item, right click, scripts, Purge Empty Libraries. This will remove all the empty Script Libraries.
Step 2: Sync with Core database
Some integrations need to be synced with the Core database through the PowerShell ISE.
Open Sitecore PowerShell ISE from Launch Page.
Go to Settings Ribbon, Rebuild All button, Sync Library with Content Editor Ribbon. This will sync the newly created integration to sync with Core database.
Since there are Show and Enable rule, if the selected item matches the rules, then button will show in the Presentation tab and we can merge the layout from Final to Shared layout by clicking the button.
Shared fields (includes Shared Layout) and Publish related items may lead to unexpected results to the content in target database.
First, let's talk about Shared Fields.
Shared fields are shared by all versions in all languages.
Shared field changes will be published even though the latest version of the item is not in final workflow state.
Shared field values cannot be staged in a draft workflow state unless we use publishing restrictions.
Scenario:
Item has a Shared field of type checkbox. Version 1 of the item has this field checked.
Version 1 is approved and published.
User creates Version 2 and it is in draft state. User updates the Shared field checkbox to unchecked.
Keeping the item in draft state, user publish the item and Sitecore will complain that the version is not in final state so it will publish the Version 1 instead.
Version 1 will be published along with the Shared field checkbox changes (unchecked).
It is known and expected that Sitecore will publish the Shared field changes along with the previously approved item version.
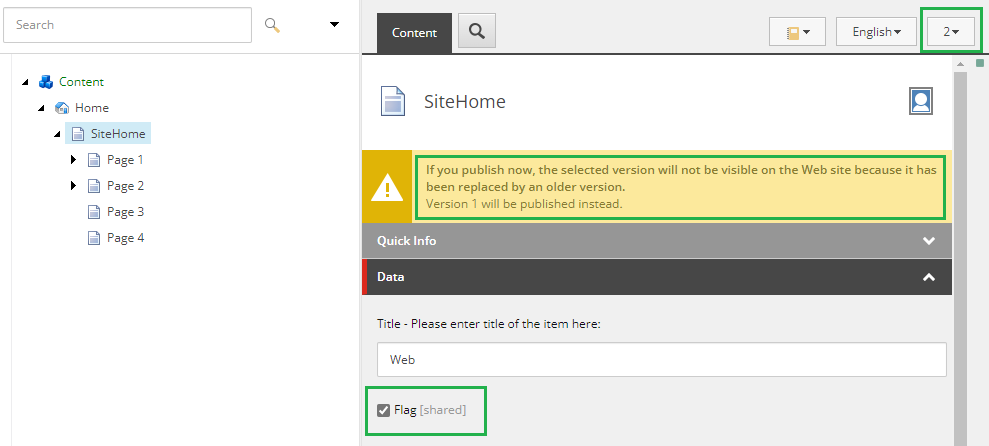
Second, let's talk about the publish related items.
Scenario:
Site has two languages: English and German.
All the items have 1 language version each and they are approved and published.
Content author A creates a new version (draft state) in SiteHome item and updates the Shared field from unchecked to checked. Also added a component in Shared Layout so that it is applicable for all the languages.
Content author B adds Blog item as a link in the CTA item and publishes CTA item with publish related items option. Deep scan is disabled in the configuration.
Looking at the above list, these three items are included for a reason.
Skipped: /sitecore/content/Home
Updated: /sitecore/content/Home/SiteHome
Skipped: /sitecore/content/Home/SiteHome/Page 2
The Blog item is a related item for CTA item. In order to publish the related item "Blog", Sitecore parse the parent items till the Sitecore's root item (/sitecore), publish it first and then publish the Blog item.
Reason: In order to maintain the same content tree in the target database, Sitecore publishes every parent items of related item before publishing the related item.
Impact:
The SiteHome item (version 2) which is in draft and has changes to a Shared field and the Shared Layout (__Renderings) are also published though it is not ready to be published. Sitecore publishes version 1 with Shared field changes to Target database.
Any out of the box configuration?
Reached out to a Sitecore MVP and also raised Sitecore support to see if there is an out of the box option to skip these parent items if the target database already has the same content tree. There is no configuration available to skip these items. Sitecore support also agree that if the content tree is same in target database, there is no reason to publish these parent items and unnecessarily publish these staged shared field changes.
Sitecore support registered a feature request to change the default Sitecore behavior that can cause problems at the site by publishing changes that are not in the final workflow state so that it can be considered for future implementation and provided a reference number.
Possible approach to fix this issue:
We can customize the <getItemReferences> pipeline to add a logic to allow a parent of related items to be published if it isn’t present in the target database. The processor "GetItemReferencesProcessor" can be tweaked to prevent publishing the parent items of the related item if the content tree matches with the source database. There will be a significant impact to the publish performance. I will create another blog once I have a working prototype with this implementation.
Recently in Sitecore 10, we faced an issue where Shared field value is not getting propagated to a new language version. There is a known KB article from Sitecore https://kb.sitecore.net/articles/045873.
As per the article, it is applicable for version 6 to version 8.2 Update 1. Tried to use this package locally to see if it works but gave method not found error. So I thought to peek into the code and do the same task in Sitecore PowerShell.
Basically we are resetting the Shared and Unversioned field value and then setting it up to the originally configured value. As per Sitecore, there might be a loss of data during the processing. A regression may be needed after the execution.
Step 1:
Find the list of template fields which are corrupted using a script.
Save the output in a CSV File with header ItemID.
Step 2:
Run the below script in Sitecore PowerShell ISE.
Select and update load the CSV file created from Step 1.
Script will run for few minutes based on the number of corrupted field ids.
Sitecore has a very good documentation on Authentication and Authorization. As stated, there are two flows.
Interactive User Login
Sitecore Username and Password are needed.
Used mostly by the developers.
Non-Interactive Client Login
Client ID and Client Secret are needed.
Client should be configured in Identity server and Identity provider should be configured in Content Management as documented.
Used for CI/CD process to automate tasks.
In both the flows,
Identity server is must.
The result of the authentication and authorization is access token. If we wanted extended expiry of tokens for a longer running process, we can opt for refresh token.
When we initiate the interactive login request using dotnet sitecore login --authority https://id.sitecorewarriors.localhost/ --cm https://cm.sitecorewarriors.localhost --allow-write true, Sitecore ID login screen will appear. Once logged in, we will get two options.
Offline Access will generate refresh token along with short lived access token. A refresh token is a credential artifact that lets a client application get new access tokens without having to ask the user to log in again.
.sitecore/user.json file will be populated with the access token and refresh token. So we should not commit the .sitecore/user.json file to source control as it contains sensitive information.
Could not locate plugin SitecoreWarriors.DevEx.Extensibility.Jobs@4.1.1. Some CLI commands may not function correctly.
To speed up the development and testing the plugin, we can manually place the plugin assembly in /.sitecore/package-cache/nuget/PluginName and add the plugin name in the sitecore.json file.
Possible Reason 1: If the assembly name and plugin name do not match, then we will get this error. Once we set the same name for plugin as well the assembly name, the dotnet sitecore -h command will list the plugin.
Possible Reason 2: If the nuget package or the plugin assembly is not placed inside a folder called plugin, you will get this error.
PS C:\Project\Working\CLI> dotnet sitecore -h
>> Begin installing NuGet packages: SitecoreWarriors.DevEx.Extensibility.Jobs@4.1.1
>>> Skipping NuGet package SitecoreWarriors.DevEx.Extensibility.Jobs@4.1.1 because it is already installed.
Could not locate plugin SitecoreWarriors.DevEx.Extensibility.Jobs@4.1.1. Some CLI commands may not function correctly.
Plugin does not supported by the current version of the CLI. Please try to update you CLI
Plugin product should be .NET Core project. If the plugin assembly project is created as a Web SDK (Microsoft.NET.Sdk.Web) project instead of just an SDK project, CLI will not be able to recognize the plugin. Make sure the project type is Microsoft.NET.Sdk.