Pages

28 June, 2022

Sitecore Docker - xdbautomationworker, cortexprocessingworker, xdbsearchworker unhealthy in Docker Desktop 4.9.1

Back to blogging after a month of learning and completing certifications. June has been a month of Certifications in Sitecore community. :) 

Containers for Sitecore development has reduced the onboarding time for new team members and it is easy to bring up and bring down a Sitecore environment without impacting much on the hosting environment. 

When Docker Desktop works, everything is fine. When it does not, sometimes we have to spend hours to find the root cause especially in an office laptops where company policies are applied. That's been the case after Docker Desktop 4.7+ onwards. 

ERROR: for cortexprocessingworker Container "22039ee585b5" is unhealthy. ERROR: for xdbautomationworker Container "22039ee585b5" is unhealthy. ERROR: for xdbsearchworker Container "22039ee585b5" is unhealthy. ERROR: Encountered errors while bringing up the project.

Recently encountered this issue with Docker Desktop 4.9.1. There are multiple ways mentioned in the below links. 

https://stackoverflow.com/questions/38088279/communication-between-multiple-docker-compose-projects/38089080#38089080

https://stackoverflow.com/questions/41093812/how-to-get-docker-containers-to-talk-to-each-other-while-running-on-my-local-hos

https://stackoverflow.com/questions/42385977/accessing-a-docker-container-from-another-container

We followed the below step to resolve the issue. 

  • Open Windows Defender Firewall with Advanced Security
  • Click Windows Defender Firewall Properties. 
  • Go to Publish Profile, click Customize in Protected network connections. 
  • Uncheck any network connections starting with name - vEthernet
  • Give 2 - 3 minutes for the changes to reflect and open Terminal again.
  • Start the containers again. 
Few experts in the community mentioned that there are other alternatives. Trying to gather the details and reference those solutions here. 

Update 7/8/2022:
Docker released Docker Desktop v4.10.1 (82475). It seems that this version has fixed many Docker related problem. 

04 June, 2022

Create, package and publish a Sitecore CLI Plugin

We (SitecoreWarriors) had a chance to participate in Sitecore Hackathon 2022 and we peeked into how the Sitecore's official plugins are created and how a new plugin can be created using Extensibility package provided by Sitecore. In this article, I wanted to explain few steps to create a new plugin, package it and publish it to nuget.org or any other private package manager. 

  1. Create Plugin Project - .NET Core Class Library
  2. Create Management Service - .NET Framework 4.8 Class Library
  3. Package and Publish Plugin 

Create Plugin Project
  • In order to create a plugin, we need to create a .NET Core Class Library. 
  • Project type should be Microsoft.NET.Sdk
  • From Sitecore Package source, add the following packages.


    • Sitecore.Devex.Client.Cli.Extensibility
      • This package helps to create an extension to the Sitecore CLI
      • Adds base for SubCommand options
    • Sitecore.DevEx.Serialization.Client
      • Enables us to use SitecoreApiClient which helps to send and receive response from Sitecore through management service. 
      • Helps to generate the API request along with access token and send it to Sitecore. 
      • Not sure why but Sitecore may move this piece out of Serialization Client package and create it as a standalone package to avoid this dependency.
  • Next step is to implement ISitecoreCliExtension interface which will let us to register Commands. As part of this sample application, we are trying to create a Job plugin which can retrieve the jobs list from Sitecore. 


  • Then we can create new SubCommand class inheriting SubcommandBase from Sitecore.Devex.Client.Cli.Extensibility package. This will let us to override the handle method to implement the logic to call Sitecore API for this SubCommand.


  • In the SubCommand implementation, use SitecoreApiClient and trigger the request to Sitecore Management API.  


Create Management Service
  • Sitecore Management Service gets the request from CLI and execute the request in Sitecore Context. 
  • Authentication token obtained from CLI login is sent as part of the Bearer token. 
  • Depending upon the solution, the dependencies changes. In this case, we needed Sitecore.Kernel, Sitecore.DependencyInjection package. 
  • Management services uses GraphQL. Queries and Mutations.

    Queries are the GraphQL equivalent to GET calls in REST. mutations represent the state-changing methods in REST (like DELETEPUTPATCH, etc).

  • In this example, we are just getting Jobs list. So we can go with query. Implement Sitecore.Services.GraphQL.Schemas.SchemaProviderBase from Sitecore.Services.GraphQL and override CreateRootQueries which in turn returns the data to be returned to CLI. Logic is get the jobs list from JobManager and return the results. 


  • Build the class library along with configuration and package it as Sitecore Package to be installed via Installation Wizard. 
Package and Publish Plugin

We can create package 
In this article, I will explain how we can package it using NuGet Package Explorer.
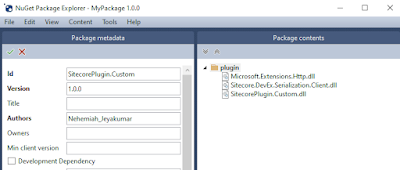
  • We need to prepare the package content. Package should have the plugin library (.dll). Please note that DLL name and the plugin name should match otherwise we may get errors. Refer this article for more details - Sitecore CLI Extension Development - Possible errors and solution
  • Once the NuGet Package Explorer is downloaded and opened, choose Create a new package. 


  • Go to Edit menu and click Edit Metadata. 
    • Add the plugin name in the ID field
    • Create a new folder called plugin
    • Add plugin class library and few other assemblies like Sitecore.DevEx.Serialization.Client and Microsoft.Extensions.Http to the plugin folder. 


  • Go to nuget.org, create a new account, login to the account, click on your username and go to API keys. 


  • Create a new API key. Provide a key name and click create. Copy the generated key and save it securely. 


  • Go back to the NuGet package explorer, go to File and click Publish. Enter the copied API key in the Publish Key or PAT field and then click publish. It should be published immediately and it may take 10 minutes for the package to be available in the nuget.org search results. 


How to install the plugin and use it
  • Install the management service package created in the second step in Sitecore CM using installation wizard. 
  • Once the package is available in nuget.org search results, you can login to CLI using dotnet sitecore login
  • Install the plugin using dotnet sitecore plugin add -n SitecorePlugin.Custom and plugin will be installed in your workstation. 

You can refer our Hackathon submission here.  


blockquote { margin: 0; } blockquote p { padding: 15px; background: #eee; border-radius: 5px; } blockquote p::before { content: '\201C'; } blockquote p::after { content: '\201D'; }