Pages

27 September, 2023

Creating an XM Cloud Project from an Existing Sitecore Solution in Bitbucket

In this blog post, I will set up an XM Cloud environment with an existing Sitecore solution.

If you are migrating an existing Sitecore solution to XM Cloud, you must migrate the source to an XM Cloud-compatible solution. To start, you can clone the XM Cloud SXA-based starter template repository. This template solution can be used as a base to migrate all of your existing projects to it. In this blog post, I will use Bitbucket as my repository, add the existing solution, and deploy it to XM Cloud. Please note that XM Cloud does not support MVC solutions. You must migrate or rewrite your MVC solution to a headless SXA solution. 

Clone Template Solution

In Bitbucket, I used the repository import feature to clone and import the template solution from the GitHub template repository. Alternatively, you can simply clone the repository to your local environment or to another Git repository.


Update template solution with the existing solution

From an existing solution perspective, I have only the Scheduled Publish module, which I have added to the template solution and checked in. In your case, you may have many projects, and you will need to migrate them to the XM Cloud-compatible template solution.

Based on Sitecore's recent blog, Sitecore recommends partners adopt industry-standard practices that align with the specific implementation technologies being used. Previously, the Helix architectural guidelines were used for MVC and Sitecore headless projects, but Sitecore no longer recommends their use for headless projects.


In this case, I am not following any guidelines, but I wanted to show how the custom solution can be migrated and deployed from other than GitHub.

Create XM Cloud Project using the updated solution

The XM Cloud Deploy app can only connect to GitHub from the admin UI. It cannot connect to other source control platforms, such as Azure DevOps or Bitbucket. Therefore, to use Bitbucket, you must create your XM Cloud project using the CLI and upload your custom code once.

CLI Login

Create Project:

Please note the Project Id that you get it in the response. 

Create Environment

Please note the Environment Id that you get it in the response. 

Create Deployment with Upload Option

That's it. 


Next Steps:

Now the CM Cloud application is ready with the custom solution hosted in BitBucket. You can then setup CI/CD with Sitecore CLI and start managing your application source code from BitBucket itself. 

You can view my sample project in BitBuket here

22 September, 2023

Using the Deploy (REST) API to Manage XM Cloud Projects and Environments

There are three ways you can interact with XM Cloud. Deploy app, CLI and REST API. In this article, we can see how we can interact with XM Cloud projects, environments and deployments. This article is just to give a glimpse of how you can use the deploy API to interact with XM Cloud. There are various API methods by which you can automate the XM cloud related tasks for your projects. 

First of all, various methods of deploy API can be viewed here. https://xmclouddeploy-api.sitecorecloud.io/swagger/index.html. You can import it in your Postman or any other API tools using the swagger json. https://xmclouddeploy-api.sitecorecloud.io/swagger/v1/swagger.json. Please note that this API has all the methods which are being used in the Deploy App. 

Import in Postman

Open Postman, click import and paste the Swagger json and it will help you to get started. 


Obtain Organization Credentials from Deploy Portal

In order to use most of the deploy API methods, we need authorization token. To get token, we need to create/get organization credentials from deploy portal. Please make sure to save the client secret otherwise we cannot retrieve it or we can create it again. 


Even, these credentials can be created using the deploy API but you will need the authorization token which is being used to login to the Sitecore Cloud portal. In case if your organization is using your own SSO for Sitecore Cloud portal, you can leverage the Client ID and Client Secret and generate the auth token and pass it to /api/clients/vi/deploy API and you can generate the credential. 

Used cloud portal auth token and created the XM Cloud Organization credential

We can see the same credential in the Deploy portal. 


Generate JWT token from XM Cloud Organization Credential

In order to generate JWT token, send a POST request to https://auth.sitecorecloud.io/oauth/token with client_id and client_secret and you will receive the access token. You can use this as bearer token for further API requests. 


Create a new XM Cloud Project

Send a POST request to /api/projects/v1 with the bearer token and it will create the project. Project Id can be seen in the response. 


Project created from API can be seen in Deploy portal.

Create Environment in XM Cloud Project

With the project Id from the previous response (or you can get the list of all the project and its properties using /api/projects/v1), you can create a new environment. Send a POST request to /api/projects/v1/:projectId/environments with the name of the environment.


Newly created environment can be seen in the portal


Creating a deployment 

For an environment, a deployment request can be created using /api/environments/v1/:environmentId/deployments. Pass the environment Id from the previous response or retrieve it using /api/projects/v1/:projectId/environments API. 


Deployment request can be seen in the portal. 


This article is just to give a glimpse of how you can use the deploy API to interact with XM Cloud. There are various APIs by which you can automate the XM cloud related tasks for your projects. 

11 September, 2023

XM Cloud: Sync Content between Environments

To sync content between XM Cloud Environments, SCS (Sitecore Content Serialization) is the preferred way when compared to old way of moving content using Sitecore Content Packages. In this article, we will move content from one environment to another by an easy way. 

Scenario: 

Two environments: DEV and PROD
Content Sync: Copy from PROD to DEV or Copy from PROD to Local
Content to be copied:

  • /sitecore/content/samplesite/samplesite/Home
  • /sitecore/content/samplesite/samplesite/Data

Sitecore Content Serialization (SCS) is a system for serializing, sharing, and deploying content items, as well as keeping them in version control.

Ref: https://doc.sitecore.com/xmc/en/developers/xm-cloud/sitecore-content-serialization.html

The flow is to connect to PROD, DEV and Local (if planning to sync it to local) environment using CLI connect command and then use CLI serialization command to pull from source Environment to target Environment. 


Step 1: Connect to Environments

Before we connect to XM Cloud Environments, it is important that Sitecore CLI with plugins are installed. XM Cloud Environment IDs are needed to connect. Use CLI connect command with --allow-write flag to enable read/write access for environments. 

PROD ID: 1rg2Cn4Nz9HlMvJDoMlp0R
DEV ID: 5uQrDqtEeitxTlNdOCTmwM

Step 2: Add Serialization Module to Content Sync Purpose

In order to sync only a specific set of content, it is optional to create a separate serialization module json file. In our scenario, we are pulling only the pages and the data folder. Create a module json with the below includes. 

Step 3: Pull Content from Source Environment

Using CLI Serialization command, pull the content by targeting only our content sync module. 

Step 4: Push Content to Target Environment


That's it. 

Every data is pulled and pushed via APIs. Copying huge number of items or bigger size media files may delay the sync process. 

06 September, 2023

Hacky way to open XM Cloud Pages App from Content Editor using Sitecore PowerShell

When a content author is using Content Editor and want to use Pages to edit the pages, author can go to XM Cloud Apps Dashboard and then open the Pages App and then navigate to the appropriate item in the tree. In order to minimize the steps for the content authors, a simple hack in the content editor can help content author to open the Pages with appropriate item directly by click of a link. 
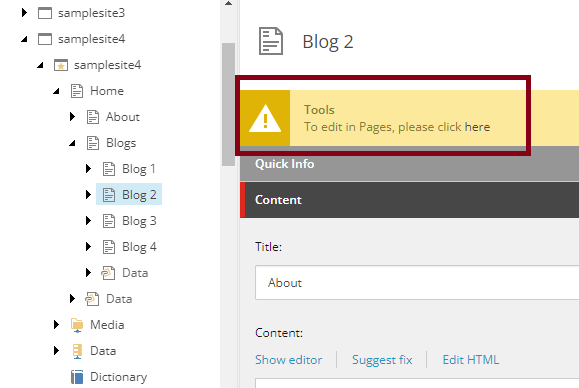
A page with Layout will have option to open it in Pages by clicking here hyperlink.

Sitecore PowerShell Extension is again helping here to set it up. Thanks to Adam Najmanowicz | @adamnaj / Michael West | @michaelwest101 for their effort to develop and release SPE for the community. 

  1. Create a new Module with Content Editor Warning integration point
  2. Go to the module and find Warning script library under Content Editor Warning item
  3. Create new PowerShell Script under that item and name it as Pages.
  4. Add the script with the below code.

Script to enable this feature:


In order to enable this feature only to the items where page layout is present, in the Enable Rule field, add ''where the item has a layout' rule. 


That's it. 

Points to remember:
  • This hacky will enable this option for all the pages where layout is present. In case if your use case is complex, then appropriate rule should be applied. 
  • The Pages link will open in another tab of the same browser. It is assumed that user is logged in to Sitecore Cloud Portal so that pages will automatically login and redirect to the selected item. 
  • Remember - This may not work for some complex Site grouping (have not tested it) but hoping Sitecore to add similar feature to open Pages from Content Editor out of the box 😊

blockquote { margin: 0; } blockquote p { padding: 15px; background: #eee; border-radius: 5px; } blockquote p::before { content: '\201C'; } blockquote p::after { content: '\201D'; }