Pages

07 November, 2023

Sitecore Scheduled Publish Module Enhancements

Sitecore Scheduled Publish Module gives the content author the option to delay the publishing of an item for a future point in time. This module has been updated to Sitecore 10.3 recently. Also, I did update this module with few additional features for better usage. 

  • Set Scheduled Publish Requestor as Publisher

    A content author schedules a publish request. When the scheduler job executes the request at the appropriate time, it publishes the content as the requestor user. This allows Ops teams to track who initiated the request. If you want to track what items are published, you can override the publish:itemProcessed event to log the details.

    With this change, the actual publish request will be executed in the requestor user context. 


  • Alert content authors if the item is not in final workflow state

    The final workflow state is an important part of Sitecore's workflow system. It helps ensure that content items are published in a controlled manner and are not accidentally changed after they are published.

    If an item scheduled for publishing is not in the final workflow state, the publish job will not publish the item or will publish the last approved item version. To remind the content authors, a warning has been added to the dialog that shows whether the item is in the final state. If the item does not have a workflow, this section is hidden. 


  • Set the current time + 2 minutes as default for publish time

    Choosing the date and time when scheduling a publish was an extra step for content authors. With this change, the current date and time plus 2 minutes will be set as the default publish time in the publish time field.


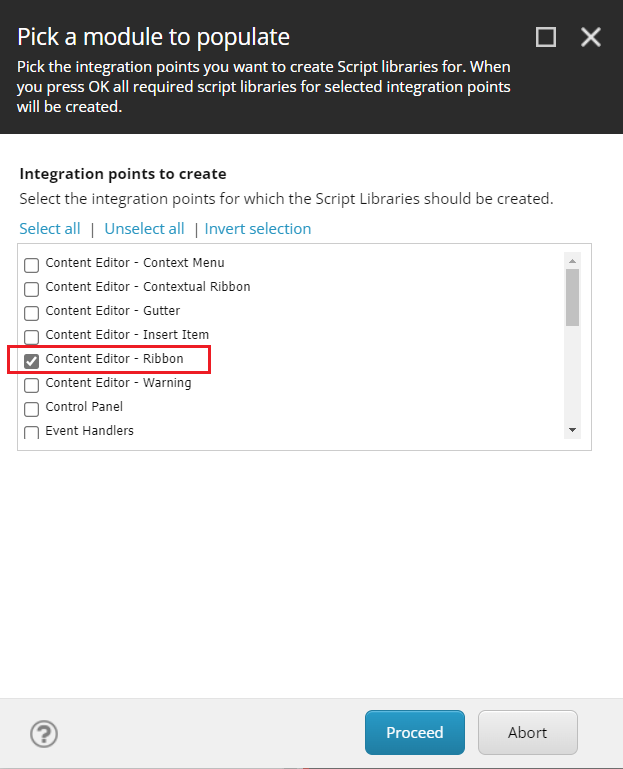
  • Updated to latest Sitecore CLI and Serialization plugin

    Updated to use the latest version of Sitecore CLI (5.2.113 as of 11/07) with Serialization plugin. 

The Sitecore packages (.zip) are yet to be updated in the repository. Please take the latest codebase for the enhancements.  

18 October, 2023

XM Cloud Certification Exam Preparation

I am excited to announce that I have recently cleared the Sitecore XM Cloud Certification exam! This certification demonstrates my skills and knowledge in using Sitecore's cloud-native SaaS CMS to create and deliver engaging omnichannel experiences.


Few community members reached out to me to share the exam experience. So I have provided all the details in this blog post. 

The Sitecore XM Cloud Certification exam is somewhat challenging one, but it is well worth the effort. The exam covers a wide range of topics, including:

  • Competency 1: XM Cloud Architecture and Developer Workflow - 12% 
  • Competency 2: Deployment of XM Cloud Projects - 16%
  • Competency 3: Renderings and Layout - 14%
  • Competency 4: Sitecore Content Serialization - 14%
  • Competency 5: Sitecore APIs & Webhooks - 10%
  • Competency 6: XM Cloud Pages - 10%
  • Competency 7: Security for Developers - 10%
  • Competency 8: Data Modeling - 14%

Exam Details

  • Multiple-choice Questions
  • 100 minutes to complete the test
  • Closed book exam
  • 50 questions (more compared to other Sitecore certs :) )
  • Schedule it in Kryterion WebAssessor
  • Cost: $350
All the exam details are clearly explained in the Study Guide: Sitecore XM Cloud Developer Certification Exam in learning portal and there are 10 sample questions in the Study guide course. 
 

How to prepare for the Sitecore XM Cloud Certification exam

Here are a few tips to help you prepare for the exam:


Topics

The study guide course in learning portal has certain links on each competencies. It is highly recommended to read those articles. I have listed below some of the topics that I remember.
  • Headless SXA knowledge is important for the exam. Site Collection, Site, Modules, Page Variants, Creating component, Placeholder, Placeholder restrictions, Dynamic Placeholder.
  • Registering XM Cloud Components
  • Webhook
  • Features of XM Cloud Pages 
  • Experience Edge Publish Process
  • Using CLI for XM Environment Setup
  • Sitecore Content Serialization - Similar to XP certification. 
  • Understand the sample GraphQL queries
  • XM Cloud Environment and Source Control link
  • XM Cloud User roles and access

Exam Discount

  • MVPs get one free Sitecore exam voucher to use. 
  • (from Sitecore learning portal) Don't forget that Partners have Sitecore Special 20% promotion for all Sitecore certification exams. Promo code is CYBERCERT20


Good Luck and Happy Learning !!!

13 October, 2023

XM Cloud Component - Recursive Loop

In XM Cloud Components builder, we can add another component as an element in the canvas. 


Once you add the component element, you can choose what component to render in the right panel.


You can select other components from the list and also you can choose the same component as well. 


This will end up into infinite self-referential recursive loops and it is going to crash the application. 

Continuous calls to FEaaS Url to load component

Sitecore can do some check or warn before allowing content authors or developers to add same component.  

As of 11/08/2023 - Sitecore has fixed it by filtering out the current component from the available component list. 

10 October, 2023

XM Cloud Build Configuration & Post Deployment Actions

In the SaaS world, we have less control on what we can do and what to deploy. This is because SaaS applications are hosted and managed by the vendor, not by the customer. This means that the customer does not have the same level of access and control over the application as they would if it were deployed on-premises. Sitecore XM Cloud is similar, but the XM Cloud build configuration allows for a few additional capabilities.

The xmcloud.build.json file is an XM Cloud build configuration file that contains a set of configurations that allow customers to control what to build, what to deploy, and various options for post-deployment actions.

There are five configuration objects the build configuration right now.

  1. deployItems:

    Gets the list of serialization module names to be deployed, creates Items as Resources (IAR) file and deployed. No support for roles in this case so if there are any roles, you will need to use Post Deployment actions (scsModules).

  2. buildTargets:

    Enables you to define which project or solution to build. Otherwise, defaults to the solution file available in the root folder. 

  3. renderingHosts:

    To configure the location for the rendering hosts and sites they map to. More information about the rendering host configuration can be read here. 

  4. tranforms:

    To process XDT transformation of your configuration. Wildcard can be used for the path. 

  5. postActions:

    Various operations can be performed after the deployment stage in the XM Cloud deployment process. The available operations are explained below. 

Post Action Operations:

  1. CM Warm-up -  warmUpCm

    This option allows you to send GET requests to a set of URLs to start up and run your CM environment. You can also use this section to call a dedicated set of pages in your CM environment to perform any business-critical actions.

    In addition, you can create ASPX pages and trigger them to initiate any tasks. For example: 
    - triggering a task to pull content from 3rd party system. 
    - triggering a job to execute a Sitecore PowerShell script
    - triggering an email to content authors
    - ... and many more

    It would be really nice if we have a way to configure and trigger Sitecore Authoring and Management GraphQL API in post deployment actions. 

  2. Schema Population -  populateSchema

    Populate the managed schema for specific indexes by listing their names.

  3. Reindexing - reindex

    Reindex specific indexes by listing their names.

  4. Publishing - publish

    You can either publish a path and sub items with certain languages or specific items alone. You can specify whether it should be smart or republish. 

  5. SCS module deployment action - scsModules

    You can also use this section to push the content using Sitecore Content Serialization. Specify the modules names to be synched. In this section, you can push the roles as well. 

Currently, customers cannot create custom post-deployment actions in XM Cloud. They must use the out-of-the-box options available in the build configuration.

It would be really nice if we have a way to configure and trigger Sitecore Authoring and Management GraphQL API in post deployment actions. 

When you create a deployment request from the CLI, you can wait for post-deployment actions to complete and see the status or progress in CLI real time. By default, CLI will skip waiting for post-deployment actions. However, you cannot prevent these steps from execution if they are part of the XM Cloud build configuration.

07 October, 2023

XM Cloud Front-End Development Options

Sitecore XM Cloud has enabled front-end developers to quickly start developing applications. There are various ways for front-end developers to get started and connect to content endpoints to develop applications. From the recent conference, I learned that Sitecore is still working on enabling front-end developers as true first-class citizens.

In this blog post, I am providing various options for the front-end developers. 

  1. Using Local XM Cloud - a.k.a Full Stack XM Cloud Local Development


    In this case, the Sitecore XM Cloud local environment should be set up on the developer's machine and will be used to serve the content for the front-end app.

    Setting up the full-stack XM Cloud local development environment can be referenced here

    Be default, XM Cloud local development environment has the following environment key values. 

    API Key: Item ID of /sitecore/system/Settings/Services/API Keys/xmcloudpreview

    GraphQL Endpoint: https://xmcloudcm.localhost/sitecore/api/graph/edge (where xmcloudcm.localhost is the host name for the local CM environment)

    - In order to setup full-stack XM Cloud local development environment, developer needs a Windows machine to setup Sitecore. 
    - Developer has full control on the Sitecore content. They can play around with content as it is not going to impact any other users. 

  2. Using XM Cloud CM - a.k.a Edge Preview 


    In this case, Sitecore XM Cloud CM environment can serve the content for the front-end app. 

    API Key: Item ID of /sitecore/system/Settings/Services/API Keys/xmcloudpreview. You can also retrieve the Edge Preview API Key from the XM Cloud deploy app. Go to your XM Cloud project in Deploy app --> Details --> Edge Preview GraphQL IDE (CM) --> Generate Preview API Token

    GraphQL Endpoint: https://<Environment host name>/sitecore/api/graph/edge (where Environment host name can be retrieved from Deploy app --> Details --> Environment host name)

    JSS_APP_NAME: name of the front-end app mentioned in package.json.

    - Developer can setup/develop the front-end app using Mac or Windows.
    - Developer can work on published and unpublished content as CM has both the content. 

  3. Using Experience Edge


    In this case, Experience Edge can serve the content for the front-end app. 

    API Key: You can retrieve the Edge Delivery API Token from the XM Cloud deploy app. Go to your XM Cloud project in Deploy app --> Details --> Edge Delivery GraphQL IDE (Experience Edge) --> Generate Preview API Token

    GraphQL Endpoint: https://edge.sitecorecloud.io/api/graphql/v1

    JSS_APP_NAME: name of the front-end app mentioned in package.json.

    - Developer can setup/develop the front-end app using Mac or Windows.
    - Developer can work only on published content as edge delivery has only published content. 

06 October, 2023

XM Cloud - Troubleshooting the integration of Pages app with local XM Cloud Instance

As per Sitecore documentation, you can connect XM Cloud Pages app to your local XM cloud instance. 

How should you do it? 
  • Once you browse Pages app (pages.sitecorecloud.io), go to browser developer tools --> Application --> Storage --> Local Storage and open the entry for https://pages.sitecorecloud.io.
  • Add a new key and value. 
    • Key: Sitecore.Pages.LocalXmCloudUrl
    • Value: Your local XM Cloud CM instance. Ex: https://xmcloudcm.localhost/
  • Refresh the pages app and it should connect to your local XM cloud instance. 
I was facing some issues after setting it up. 
  1. login.sitecorecloud.io refused to connect or couldn't retrieve the page. 


    This happens when your local XM Cloud instance is not logged in. Make sure you login to use local XM Cloud instance in the same browser (another tab) and this error should go away. 

  2. Pages app does not render the content and components from local XM Cloud instance


    Looking at the console log, a possible certificate exception appeared.


    In the environment file, the public rendering host is www.xmcloudpreview.localhost. The Pages app is using https://xmcloudcm.localhost as the local XM Cloud URL, as we set it in the local storage key Sitecore.Pages.LocalXmCloudUrl. Then, the local XM Cloud instance calls the public rendering host and gets the content. However, the local XM Cloud instance does not have a valid certificate for the public rendering host www.xmcloudpreview.localhost.

    Once the certificate was created and placed in the \docker\traefik\certs folder and the config \docker\traefik\config\dynamic\certs_config.yaml was added, the rendering host public URL started working without any certificate errors and the pages app was also able to render the page for editing.

    Go to \docker\traefik\certs, run mkcert www.xmcloudpreview.localhost and it will create the cert and key. You can refer it in certs_config.yaml and restart the rendering container alone. 

    I am looking for other options or solutions which can fix this issue. If this is the only way, Sitecore can add it as part of their initial XM Cloud local instance setup itself. 


27 September, 2023

Creating an XM Cloud Project from an Existing Sitecore Solution in Bitbucket

In this blog post, I will set up an XM Cloud environment with an existing Sitecore solution.

If you are migrating an existing Sitecore solution to XM Cloud, you must migrate the source to an XM Cloud-compatible solution. To start, you can clone the XM Cloud SXA-based starter template repository. This template solution can be used as a base to migrate all of your existing projects to it. In this blog post, I will use Bitbucket as my repository, add the existing solution, and deploy it to XM Cloud. Please note that XM Cloud does not support MVC solutions. You must migrate or rewrite your MVC solution to a headless SXA solution. 

Clone Template Solution

In Bitbucket, I used the repository import feature to clone and import the template solution from the GitHub template repository. Alternatively, you can simply clone the repository to your local environment or to another Git repository.


Update template solution with the existing solution

From an existing solution perspective, I have only the Scheduled Publish module, which I have added to the template solution and checked in. In your case, you may have many projects, and you will need to migrate them to the XM Cloud-compatible template solution.

Based on Sitecore's recent blog, Sitecore recommends partners adopt industry-standard practices that align with the specific implementation technologies being used. Previously, the Helix architectural guidelines were used for MVC and Sitecore headless projects, but Sitecore no longer recommends their use for headless projects.


In this case, I am not following any guidelines, but I wanted to show how the custom solution can be migrated and deployed from other than GitHub.

Create XM Cloud Project using the updated solution

The XM Cloud Deploy app can only connect to GitHub from the admin UI. It cannot connect to other source control platforms, such as Azure DevOps or Bitbucket. Therefore, to use Bitbucket, you must create your XM Cloud project using the CLI and upload your custom code once.

CLI Login

Create Project:

Please note the Project Id that you get it in the response. 

Create Environment

Please note the Environment Id that you get it in the response. 

Create Deployment with Upload Option

That's it. 


Next Steps:

Now the CM Cloud application is ready with the custom solution hosted in BitBucket. You can then setup CI/CD with Sitecore CLI and start managing your application source code from BitBucket itself. 

You can view my sample project in BitBuket here

22 September, 2023

Using the Deploy (REST) API to Manage XM Cloud Projects and Environments

There are three ways you can interact with XM Cloud. Deploy app, CLI and REST API. In this article, we can see how we can interact with XM Cloud projects, environments and deployments. This article is just to give a glimpse of how you can use the deploy API to interact with XM Cloud. There are various API methods by which you can automate the XM cloud related tasks for your projects. 

First of all, various methods of deploy API can be viewed here. https://xmclouddeploy-api.sitecorecloud.io/swagger/index.html. You can import it in your Postman or any other API tools using the swagger json. https://xmclouddeploy-api.sitecorecloud.io/swagger/v1/swagger.json. Please note that this API has all the methods which are being used in the Deploy App. 

Import in Postman

Open Postman, click import and paste the Swagger json and it will help you to get started. 


Obtain Organization Credentials from Deploy Portal

In order to use most of the deploy API methods, we need authorization token. To get token, we need to create/get organization credentials from deploy portal. Please make sure to save the client secret otherwise we cannot retrieve it or we can create it again. 


Even, these credentials can be created using the deploy API but you will need the authorization token which is being used to login to the Sitecore Cloud portal. In case if your organization is using your own SSO for Sitecore Cloud portal, you can leverage the Client ID and Client Secret and generate the auth token and pass it to /api/clients/vi/deploy API and you can generate the credential. 

Used cloud portal auth token and created the XM Cloud Organization credential

We can see the same credential in the Deploy portal. 


Generate JWT token from XM Cloud Organization Credential

In order to generate JWT token, send a POST request to https://auth.sitecorecloud.io/oauth/token with client_id and client_secret and you will receive the access token. You can use this as bearer token for further API requests. 


Create a new XM Cloud Project

Send a POST request to /api/projects/v1 with the bearer token and it will create the project. Project Id can be seen in the response. 


Project created from API can be seen in Deploy portal.

Create Environment in XM Cloud Project

With the project Id from the previous response (or you can get the list of all the project and its properties using /api/projects/v1), you can create a new environment. Send a POST request to /api/projects/v1/:projectId/environments with the name of the environment.


Newly created environment can be seen in the portal


Creating a deployment 

For an environment, a deployment request can be created using /api/environments/v1/:environmentId/deployments. Pass the environment Id from the previous response or retrieve it using /api/projects/v1/:projectId/environments API. 


Deployment request can be seen in the portal. 


This article is just to give a glimpse of how you can use the deploy API to interact with XM Cloud. There are various APIs by which you can automate the XM cloud related tasks for your projects. 

11 September, 2023

XM Cloud: Sync Content between Environments

To sync content between XM Cloud Environments, SCS (Sitecore Content Serialization) is the preferred way when compared to old way of moving content using Sitecore Content Packages. In this article, we will move content from one environment to another by an easy way. 

Scenario: 

Two environments: DEV and PROD
Content Sync: Copy from PROD to DEV or Copy from PROD to Local
Content to be copied:

  • /sitecore/content/samplesite/samplesite/Home
  • /sitecore/content/samplesite/samplesite/Data

Sitecore Content Serialization (SCS) is a system for serializing, sharing, and deploying content items, as well as keeping them in version control.

Ref: https://doc.sitecore.com/xmc/en/developers/xm-cloud/sitecore-content-serialization.html

The flow is to connect to PROD, DEV and Local (if planning to sync it to local) environment using CLI connect command and then use CLI serialization command to pull from source Environment to target Environment. 


Step 1: Connect to Environments

Before we connect to XM Cloud Environments, it is important that Sitecore CLI with plugins are installed. XM Cloud Environment IDs are needed to connect. Use CLI connect command with --allow-write flag to enable read/write access for environments. 

PROD ID: 1rg2Cn4Nz9HlMvJDoMlp0R
DEV ID: 5uQrDqtEeitxTlNdOCTmwM

Step 2: Add Serialization Module to Content Sync Purpose

In order to sync only a specific set of content, it is optional to create a separate serialization module json file. In our scenario, we are pulling only the pages and the data folder. Create a module json with the below includes. 

Step 3: Pull Content from Source Environment

Using CLI Serialization command, pull the content by targeting only our content sync module. 

Step 4: Push Content to Target Environment


That's it. 

Every data is pulled and pushed via APIs. Copying huge number of items or bigger size media files may delay the sync process. 

06 September, 2023

Hacky way to open XM Cloud Pages App from Content Editor using Sitecore PowerShell

When a content author is using Content Editor and want to use Pages to edit the pages, author can go to XM Cloud Apps Dashboard and then open the Pages App and then navigate to the appropriate item in the tree. In order to minimize the steps for the content authors, a simple hack in the content editor can help content author to open the Pages with appropriate item directly by click of a link. 

A page with Layout will have option to open it in Pages by clicking here hyperlink.

Sitecore PowerShell Extension is again helping here to set it up. Thanks to Adam Najmanowicz | @adamnaj / Michael West | @michaelwest101 for their effort to develop and release SPE for the community. 

  1. Create a new Module with Content Editor Warning integration point
  2. Go to the module and find Warning script library under Content Editor Warning item
  3. Create new PowerShell Script under that item and name it as Pages.
  4. Add the script with the below code.

Script to enable this feature:


In order to enable this feature only to the items where page layout is present, in the Enable Rule field, add ''where the item has a layout' rule. 


That's it. 

Points to remember:
  • This hacky will enable this option for all the pages where layout is present. In case if your use case is complex, then appropriate rule should be applied. 
  • The Pages link will open in another tab of the same browser. It is assumed that user is logged in to Sitecore Cloud Portal so that pages will automatically login and redirect to the selected item. 
  • Remember - This may not work for some complex Site grouping (have not tested it) but hoping Sitecore to add similar feature to open Pages from Content Editor out of the box 😊

31 August, 2023

Sitecore CLI - XM Cloud Plugin Cheat sheet

Documented various XM Cloud Plugin CLI commands options in the cheatography.  

Here is the link for the cheatography. 


Happy Learning !!!

30 August, 2023

Empower XM Cloud Users to view the Latest XM Cloud Deployment status in Content Editor using Sitecore PowerShell


XM Cloud Deploy App can be accessed only by Organization Admin or Organization Owner in the Sitecore Cloud Portal organization. An Organization Admin or Organization Owner can grant a team member access to the XM Cloud Deploy app by changing their organization role to Admin. For a regular XM Cloud User, this will be a black box and they do not know whether the deployment has been started or what is the status of the deployment.

In order to empower the XM Cloud Users to view the deployment status, we can leverage the power of Sitecore PowerShell and XM Cloud Deploy API to provide the status of the latest deployment. 

This approach can be enhanced to view other details from the XM Cloud Deploy App for the regular XM Cloud Users who are not Organization Admin or Organization Owner. 
The limitation in XM Cloud Deploy API is that it requires Organization Automation Client even though we need access to only certain XM Cloud Environment of a XM Cloud Project. So we need to store this information securely in encrypted connection string or get it from a Key Vault as Organization Automation Client has the power to destroy your entire XM Cloud Organization. 🤷  
In this article, we use Sitecore PowerShell Script to add a button for regular XM Cloud users to view the latest deployment status. 

Step 1: Add Integration Point & Module

With Sitecore PowerShell (SPE), there are multiple integration points available that may be added to modules. In this case, we need to add it as a Chunk in Presentation Ribbon. 
  • Add PowerShell Script Module in Script Library folder with a name. Example: Sample


  • In the newly Sample PowerShell Script Module item, add a Integration Point Libraries. This will open a window to select the integration points. In this dialog, choose Content Editor - Ribbon. This will add the ribbons which are available in this system as Script Library


  • In the Publish item, add a PowerShell Script Library called XM Cloud Deployment. This will be the name of the chunk in the Publish ribbon. And then add a PowerShell script item called Get Deployment Status. We can set an icon in the Appearance section of this item to match with the purpose of this button (/~/icon/apps/32x32/Announcements.png). 
  • In the script body, we can add this script to get the latest deployment status of the particular environment. 
  • In order to remove all the empty Ribbon libraries, go to Sample PowerShell Script Module item, right click, scripts, Purge Empty Libraries. This will remove all the empty Script Libraries. 


Step 2: Sync with Core database

Some integrations need to be synced with the Core database through the PowerShell ISE. 
  1. Open Sitecore PowerShell ISE from Launch Page. 
  2. Go to Settings Ribbon, Rebuild All button, Sync Library with Content Editor Ribbon. This will sync the newly created integration to sync with Core database. 


The below script has few optional section. 

Option 1: Checking whether the current CM hostname matches with the XM Cloud Environment hostname. Sometimes this script may be copied from different XM cloud instance and this module may show the deployment status of wrong environment.  

Option 2: Leverage the second option to show the recent deployment requests which includes recent failed, in progress, completed and queued deployment requests in a PowerShell report.  


blockquote { margin: 0; } blockquote p { padding: 15px; background: #eee; border-radius: 5px; } blockquote p::before { content: '\201C'; } blockquote p::after { content: '\201D'; }