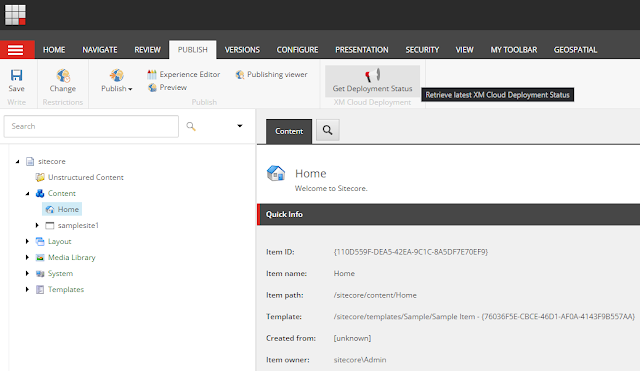
In order to empower the XM Cloud Users to view the deployment status, we can leverage the power of Sitecore PowerShell and XM Cloud Deploy API to provide the status of the latest deployment.
This approach can be enhanced to view other details from the XM Cloud Deploy App for the regular XM Cloud Users who are not Organization Admin or Organization Owner.
The limitation in XM Cloud Deploy API is that it requires Organization Automation Client even though we need access to only certain XM Cloud Environment of a XM Cloud Project. So we need to store this information securely in encrypted connection string or get it from a Key Vault as Organization Automation Client has the power to destroy your entire XM Cloud Organization. 🤷
In this article, we use Sitecore PowerShell Script to add a button for regular XM Cloud users to view the latest deployment status.
Step 1: Add Integration Point & Module
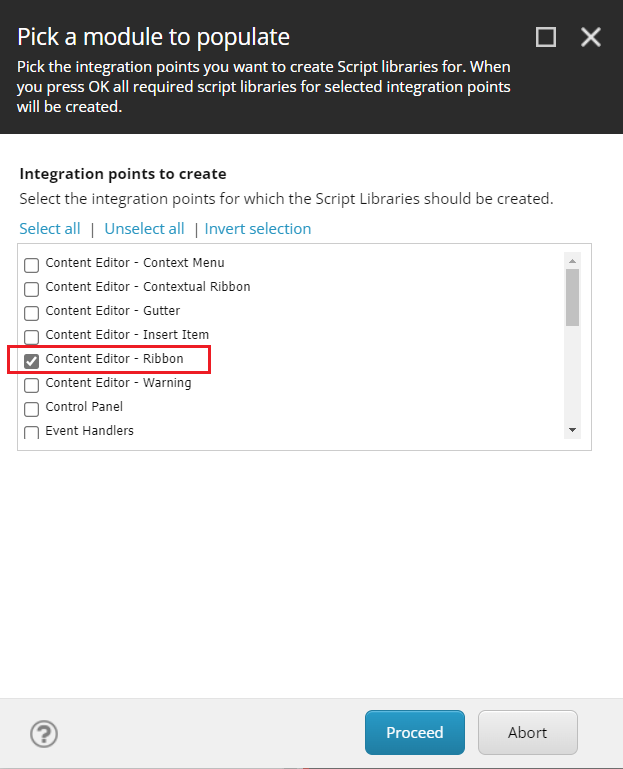
With Sitecore PowerShell (SPE), there are multiple integration points available that may be added to modules. In this case, we need to add it as a Chunk in Presentation Ribbon.
- Add PowerShell Script Module in Script Library folder with a name. Example: Sample

- In the newly Sample PowerShell Script Module item, add a Integration Point Libraries. This will open a window to select the integration points. In this dialog, choose Content Editor - Ribbon. This will add the ribbons which are available in this system as Script Library.


- In the Publish item, add a PowerShell Script Library called XM Cloud Deployment. This will be the name of the chunk in the Publish ribbon. And then add a PowerShell script item called Get Deployment Status. We can set an icon in the Appearance section of this item to match with the purpose of this button (/~/icon/apps/32x32/Announcements.png).
- In the script body, we can add this script to get the latest deployment status of the particular environment.
- In order to remove all the empty Ribbon libraries, go to Sample PowerShell Script Module item, right click, scripts, Purge Empty Libraries. This will remove all the empty Script Libraries.


Step 2: Sync with Core database
Some integrations need to be synced with the Core database through the PowerShell ISE.
- Open Sitecore PowerShell ISE from Launch Page.
- Go to Settings Ribbon, Rebuild All button, Sync Library with Content Editor Ribbon. This will sync the newly created integration to sync with Core database.


The below script has few optional section.
Option 1: Checking whether the current CM hostname matches with the XM Cloud Environment hostname. Sometimes this script may be copied from different XM cloud instance and this module may show the deployment status of wrong environment.
Option 2: Leverage the second option to show the recent deployment requests which includes recent failed, in progress, completed and queued deployment requests in a PowerShell report.
No comments:
Post a Comment